In this guide, you will learn how to install Paperless-ngx on a Virtual Private Server (VPS), running Linux Ubuntu, and expose it on a subdomain.
Listen to this AI-generated podcast summarizing the article content for easier digestion
Paperless-ngx is a popular software for managing and digitizing documents of various types. The tool excels, especially with OCR text recognition, intelligent search functionality, and innovative document structuring.
In conjunction with a suitable scanner, documents can be easily digitized, stored, and retrieved. There are various ways to install Paperless-ngx, such as:
This guide explains how to install Paperless-ngx on a VPS and expose it on a subdomain. This allows you to access your archive via the web from any device.
The advantage of using a VPS lies in its cost-effectiveness (you can rent a VPS monthly from various providers). In comparison, a NAS can cost around 600 dollars. A VPS is a good way to start inexpensively and test the Paperless workflow.
You can consider under which subdomain you want to deploy Paperless-ngx (e.g., paperless.domain.com). Alternatively, after installation, you can access the software using the IP address of your VPS.
First, you need a VPS.
I recommend choosing a Linux server with an Ubuntu version of 20.04 or higher. At some providers, you can select to pre-install Docker so that you won't have to install this software later.
A popular option is Digital Ocean. Their infrastructure is very reliable, secure, and easy to use. Besides that, they offer $200 of free credits for new customers. It expires after 60 days, which is more than enough time to try out Paperless-ngx or any other setup for free.
Order a so-called droplet that has a minimum of 2 GB of RAM and ideally 2 cores or more. Select the data center that is closest to your location for maximum speed.
After ordering a package, you will receive the access details via email. For the installation, you will need the IP address of your VPS and the root password.
You create a subdomain with your domain provider (usually where your website is hosted, e.g. at namecheap). You can choose any name that precedes your top-level domain (e.g., paperless.your-top-level-domain.com). You will later access the Paperless-ngx installation at this address.
Next, you need to adjust the DNS settings for your domain. The new subdomain must point to the IP address of your VPS. You can find the DNS settings with the provider where you registered your domain.
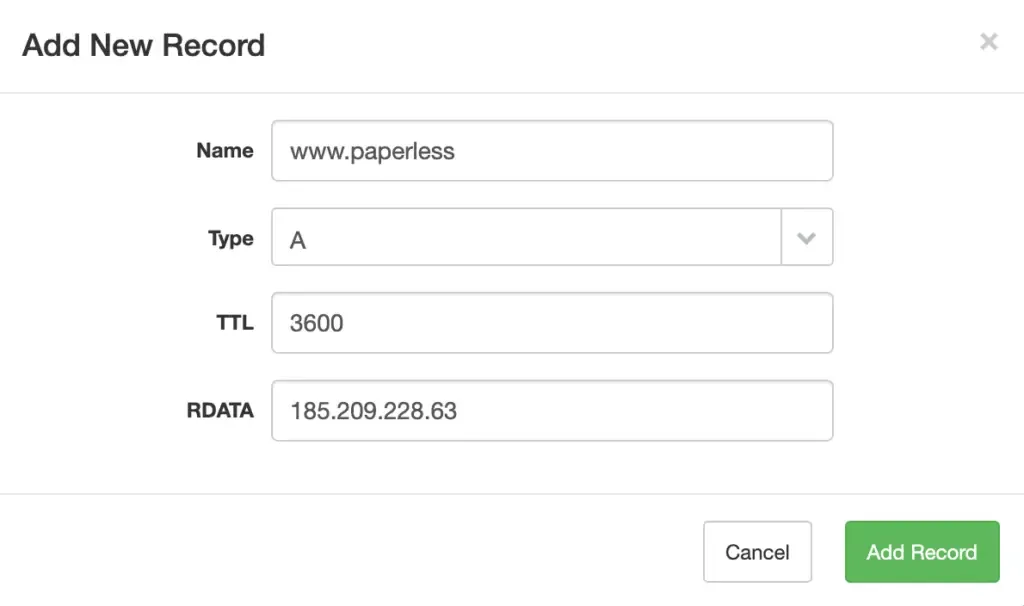
When accessing the settings, create an A-record with the name of your subdomain (e.g. paperless). In the IP field, enter the IP address of your VPS, which you received during the order.
Afterward, create a second A-record with the syntax www.Your-Subdomain (e.g. www.paperless) and the same IP address as before. This ensures that your domain points to your VPS both with and without entering www. in the browser.
Finally, save the DNS settings. It may take up to 48 hours for the DNS settings to be globally propagated.
You can check if your settings have been adopted on websites like dnschecker. Enter your subdomain in the input field (e.g. paperless.domain.com) and select A-Record.
Your VPS should then be accessible through your browser.
In this step, log in to your VPS and create a new user with admin rights. We will install Paperless-ngx using this user, and we recommend not using the root user.
Open a terminal and log in to your VPS via SSH using the root user. Replace the IP address with the IP of your VPS:
1ssh [email protected]
Afterwards, you will be prompted for a password. Enter the password you chose during the ordering process of your VPS.
1[email protected]'s password:
Now, you can create a new user with any name:
1sudo adduser demo
12Adding user `demo' ...3Adding new group `demo' (1001) ...4Adding new user `demo' (1001) with group `demo' ...5Creating home directory `/home/demo' ...6Copying files from `/etc/skel' ...7New password:
Assign a secure password. After that, you will be asked for information about the user. You can either enter values or leave them blank by pressing ENTER.
12passwd: password updated successfully3Changing the user information for demo4Enter the new value, or press ENTER for the default5 Full Name []:6 Room Number []:7 Work Phone []:8 Home Phone []:9 Other []:10Is the information correct? [Y/n] y
Your new user is now created. If you have done everything correctly, you should see the following output when entering this command:
1id demo
1uid=1001(demo) gid=1001(demo) groups=1001(demo)
The user currently has default privileges. In the next step, we will give administrative rights to the user so that we can install software:
1sudo usermod -a -G sudo demo
Now, let's switch to the new user:
1su -l demo
The following command is now executable; enter the password you chose for the new user earlier:
1sudo apt update
This checks for updates to the installed packages.
For the next steps, you need the created user.
You can skip this step if you selected Docker during the order of your VPS. You can check if Docker is already installed by entering the following command and getting a version in return:
1docker -v
1Docker version 24.0.7, build afdd53b
If Docker is not installed, you can refer to the Docker documentation for the essential steps, which we will go through below.
1. Create the Docker apt directory.
Add Docker's official GPG key:
1sudo apt-get update2sudo apt-get install ca-certificates curl gnupg3sudo install -m 0755 -d /etc/apt/keyrings4curl -fsSL https://download.docker.com/linux/ubuntu/gpg | sudo gpg --dearmor -o /etc/apt/keyrings/docker.gpg5sudo chmod a+r /etc/apt/keyrings/docker.gpg
Add the directory to the apt sources:
1echo \2 "deb [arch=$(dpkg --print-architecture) signed-by=/etc/apt/keyrings/docker.gpg] https://download.docker.com/linux/ubuntu \3 $(. /etc/os-release && echo "$VERSION_CODENAME") stable" | \4 sudo tee /etc/apt/sources.list.d/docker.list > /dev/null5sudo apt-get update
2. Install Docker packages
To install the latest version, execute this command:
1sudo apt-get install docker-ce docker-ce-cli containerd.io docker-buildx-plugin docker-compose-plugin
3. Verify that Docker has been successfully installed by running the hello-world image:
1sudo docker run hello-world
This command downloads a test image and runs it in a container. Once the container is started, a confirmation will be displayed, and then the container will exit.
Now you are ready to install Paperless-ngx on your VPS. We will use the installation script provided by Paperless-ngx. You can explore additional installation options in the Paperless-ngx documentation.
Execute the following command to start the installation:
1bash -c "$(curl --location --silent --show-error https://raw.githubusercontent.com/paperless-ngx/paperless-ngx/main/install-paperless-ngx.sh)"
1#############################################2### paperless-ngx docker installation ###3#############################################45This script will download, configure and start paperless-ngx.671. Application configuration8============================910The URL paperless will be available at. This is required if the11installation will be accessible via the web, otherwise can be left blank.12Example: https://paperless.example.com1314URL []:
Now, enter the complete address of your subdomain through which you want to access Paperless-ngx:
1URL []: https://paperless.domain.com
1The port on which the paperless webserver will listen for incoming2connections.34Port [8000]:
Simply press ENTER to use the default port 8000.
1Paperless requires you to configure the current time zone correctly.2Otherwise, the dates of your documents may appear off by one day,3depending on where you are on earth.4Example: Europe/Berlin5See here for a list: https://en.wikipedia.org/wiki/List_of_tz_database_time_zones67Current time zone []:
Here, specify your time zone. You can find the correct identifier on the provided Wikipedia page.
1Database backend: PostgreSQL, MariaDB, and SQLite are available. Use PostgreSQL2if unsure. If you're running on a low-power device such as Raspberry3Pi, use SQLite to save resources.45Database backend (postgres sqlite mariadb) [postgres]:
Here, choose a database. We recommend PostgreSQL. For postgres, simply press ENTER.
1Paperless is able to use Apache Tika to support Office documents such as2Word, Excel, Powerpoint, and Libreoffice equivalents. This feature3requires more resources due to the required services.45Enable Apache Tika? (yes no) [no]:
In this step, choose whether you want to use Apache Tika. If you plan to upload Office documents to Paperless-ngx later, you should enable this option.
The background is that Paperless-ngx only accepts permanent file formats (such as PDF). Uploading Office documents like Word, Excel, and PowerPoint does not work by default.
Apache Tika reads the documents and creates PDFs that Paperless-ngx can process seamlessly. If you want to enable Apache Tika, type yes.
1Specify the default language that most of your documents are written in.2Use ISO 639-2, (T) variant language codes:3https://www.loc.gov/standards/iso639-2/php/code_list.php4Common values: eng (English) deu (German) nld (Dutch) fra (French)5This can be a combination of multiple languages such as deu+eng67OCR language [eng]:
This step is important to set the language of your documents so that the OCR search function works correctly later. For example, if you want to enable English and German, enter eng+deu. The exact country code is crucial.
You can find a list of all country codes at the provided link.
1Specify the user id and group id you wish to run paperless as.2Paperless will also change ownership on the data, media and consume3folder to the specified values, so it's a good idea to supply the user id4and group id of your unix user account.5If unsure, leave default.67User ID [501]:
Press ENTER to accept the defaults.
1Group ID [20]:
Press ENTER to accept the defaults.
12. Folder configuration2=======================34The target folder is used to store the configuration files of5paperless. You can move this folder around after installing paperless.6You will need this folder whenever you want to start, stop, update or7maintain your paperless instance.89Target folder [/home/demo/paperless-ngx]:
Here, choose the folder where Paperless-ngx should be installed. Press ENTER to accept the defaults.
1The consume folder is where paperless will search for new documents.2Point this to a folder where your scanner is able to put your scanned3documents.45CAUTION: You must specify an absolute path starting with / or a relative6path starting with ./ here. Examples:7 /mnt/consume8 ./consume910Consume folder [/home/demo/paperless-ngx/consume]:
In this step, you can change the path of the consume folder. This is the folder where your scanner must place the files for the import to work correctly.
1The media folder is where paperless stores your documents.2Leave empty and docker will manage this folder for you.3Docker usually stores managed folders in /var/lib/docker/volumes.45CAUTION: If specified, you must specify an absolute path starting with /6or a relative path starting with ./ here.78Media folder []:
In this step, you will be asked for the storage path of the media folder. This folder is where your imported documents will be stored.
By default, Docker manages this folder. I recommend setting it to ./media so that you can easily access it later.
1The data folder is where paperless stores other data, such as your2search index and other data.3As with the media folder, leave empty to have this managed by docker.45CAUTION: If specified, you must specify an absolute path starting with /6or a relative path starting with ./ here.78Data folder []:
The same applies to the data folder. I recommend setting it to ./data.
1The database folder, where your database stores its data.2Leave empty to have this managed by docker.34CAUTION: If specified, you must specify an absolute path starting with /5or a relative path starting with ./ here.67Database folder []:
The same recommendation applies to the database folder. I suggest specifying ./database here.
13. Login credentials2====================34Specify initial login credentials. You can change these later.5A mail address is required, however it is not used in paperless. You don't6need to provide an actual mail address.78Paperless username [tobias]:9Paperless password:10Paperless password (again):11Email [demo@localhost]:
Now, set a username and password. You will need this for the login. A valid email address is not necessary but can be set.
Afterward, you will see a summary of your initial configurations. Press any key to confirm the configuration and install Paperless-ngx.
Paperless-ngx is now running on port 8000. Open your browser and navigate to your subdomain specifying the port (e.g. http://paperless.domain.com:8000/). Paperless-ngx should start, and you can log in.
Currently, specifying the port is still mandatory. In the next step, I will show you how to access Paperless-ngx without specifying the port.
A reverse proxy is the recommended method for making an application server accessible on the internet. Nginx is a popular web server and a widely used reverse proxy solution.
You can install Nginx on Ubuntu using apt. First, update your directory index. Then install Nginx:
1sudo apt update2sudo apt install nginx
Press Y to proceed with the installation. If asked whether to restart the service, press ENTER to accept the defaults.
You need to grant access to Nginx in your firewall. To do this, add the following rule:
1sudo ufw allow 'Nginx HTTP'
Now, you can check if Nginx is running.
1systemctl status nginx
1● nginx.service - A high performance web server and a reverse proxy server2 Loaded: loaded (/lib/systemd/system/nginx.service; enabled; vendor preset: enabled)3 Active: active (running) since Tue 2024-01-25 06:52:46 UTC; 39min ago4 Docs: man:nginx(8)5 Main PID: 9919 (nginx)6 Tasks: 2 (limit: 2327)7 Memory: 2.9M8 CPU: 50ms9 CGroup: /system.slice/nginx.service10 ├─9919 "nginx: master process /usr/sbin/nginx -g daemon on; master_process on;"11 └─9920 "nginx: worker process
It is recommended to create a separate configuration file instead of directly editing the default configuration. Create and open a new Nginx configuration using nano or any other text editor:
1sudo nano /etc/nginx/sites-available/paperless.domain.com
Insert this code block into your file and replace paperless.domain.com with your domain. client_max_body_size defines the maximum file size you can upload. Modify the value if you want to upload larger files to Paperless. The parameters after proxy_pass are necessary for websockets to work in Paperless.
1client_max_body_size 10M;23server {4 listen 80;5 listen [::]:80;67 server_name paperless.domain.com www.paperless.domain.com;89 location / {10 proxy_pass http://localhost:8000;1112 proxy_http_version 1.1;13 proxy_set_header Upgrade $http_upgrade;14 proxy_set_header Connection "upgrade";1516 proxy_redirect off;17 proxy_set_header Host $host;18 proxy_set_header X-Real-IP $remote_addr;19 proxy_set_header X-Forwarded-For $proxy_add_x_forwarded_for;20 proxy_set_header X-Forwarded-Host $server_name;21 }22}
Save and exit nano by pressing CTRL+X. Then confirm with Y and press ENTER.
Afterward, activate the configuration. Create a link from the configuration to the sites-enabled directory, which Nginx reads during startup:
1sudo ln -s /etc/nginx/sites-available/paperless.domain.com /etc/nginx/sites-enabled/
You can now test your configuration for syntax errors:
1sudo nginx -t
If no issues are reported, restart Nginx to apply the changes:
1sudo systemctl restart nginx
Nginx is now configured as a reverse proxy for your application server. You can access Paperless-ngx through the browser without specifying the port.
You may have noticed that when accessing your domain, it starts with http:// instead of https://. This represents an insecure connection.
First, install snap on Ubuntu:
1sudo apt install snapd
Secure your application with Let’s Encrypt by entering the following command:
1sudo snap install --classic certbot
Link the certbot command from the snap installation directory to your path, so you can run certbot directly:
1sudo ln -s /snap/bin/certbot /usr/bin/certbot
Next, allow HTTPS traffic with the Nginx Full profile:
1sudo ufw allow 'Nginx Full'
Delete the Nginx HTTP profile, which we no longer need:
1sudo ufw delete allow 'Nginx HTTP'
Now, use certbot with your domain name to obtain the certificate:
1sudo certbot --nginx -d paperless.domain.com -d www.paperless.domain.com
You will be prompted to enter an email address and agree to the Terms of Service. You can also decide whether to subscribe to an email list or not. Afterwards, you will receive a message stating that the process was successful, and the certificate has been issued:
1. . .2Successfully received certificate.3Certificate is saved at: /etc/letsencrypt/live/paperless.domain.com/fullchain.pem4Key is saved at: /etc/letsencrypt/live/paperless.domain.com/privkey.pem5This certificate expires on 2024-04-01.6These files will be updated when the certificate renews.7Certbot has set up a scheduled task to automatically renew this certificate in the background.89Deploying certificate10Successfully deployed certificate for paperless.domain.com to /etc/nginx/sites-enabled/paperless.domain.com11Successfully deployed certificate for www.paperless.domain.com /etc/nginx/sites-enabled/paperless.domain.com12Congratulations! You have successfully enabled HTTPS on https://paperless.domain.com and https://www.paperless.domain.com13. . .
Navigate to your domain. You will be automatically redirected to https://.
In this guide, you have set up your VPS, configured a subdomain pointing to your VPS, created a user, installed Docker and Paperless-ngx. Finally, you configured Nginx as a reverse proxy and secured your domain with an SSL certificate.
Paperless-ngx should now be accessible via your subdomain and automatically redirect to https. You can now close the terminal. In the event of a server restart, Docker will automatically restart Paperless-ngx.
Log in and continue setting up your workflow. If you want to add another layer of protection, check out my article about setting up a two-factor authentication for Paperless-ngx.
Keep reading
We write about coding agents, multi-agent systems, AI pair programming, and the engineering practices we use with clients. Hands-on lessons from real projects, not high-level theory.
Browse all articles