Build an AI sales system that works while you sleep with this CrewAI n8n tutorial. Create personalized offers that boost conversions using multi-agents.
Listen to this AI-generated podcast summarizing the article content for easier digestion
Tired of sending the same sales pitches to all of your customers? Want to increase your conversion rates and revenue without spending hours crafting personalized offers?
Today we'll be building a multi-agent AI sales system that sends personalized sales offers to customers automatically. The system works while you sleep, increasing conversion and revenue through tailored messaging.
This CrewAI n8n tutorial will show you how to build an automated sales system that can analyze customer data, create detailed profiles, generate custom offers, and deliver them directly to customers - all without human intervention.
We'll be using the CrewAI framework combined with an n8n workflow to create this powerful AI sales automation system. Our approach uses multiple specialized AI agents working together to create truly personalized sales experiences.
The system consists of:
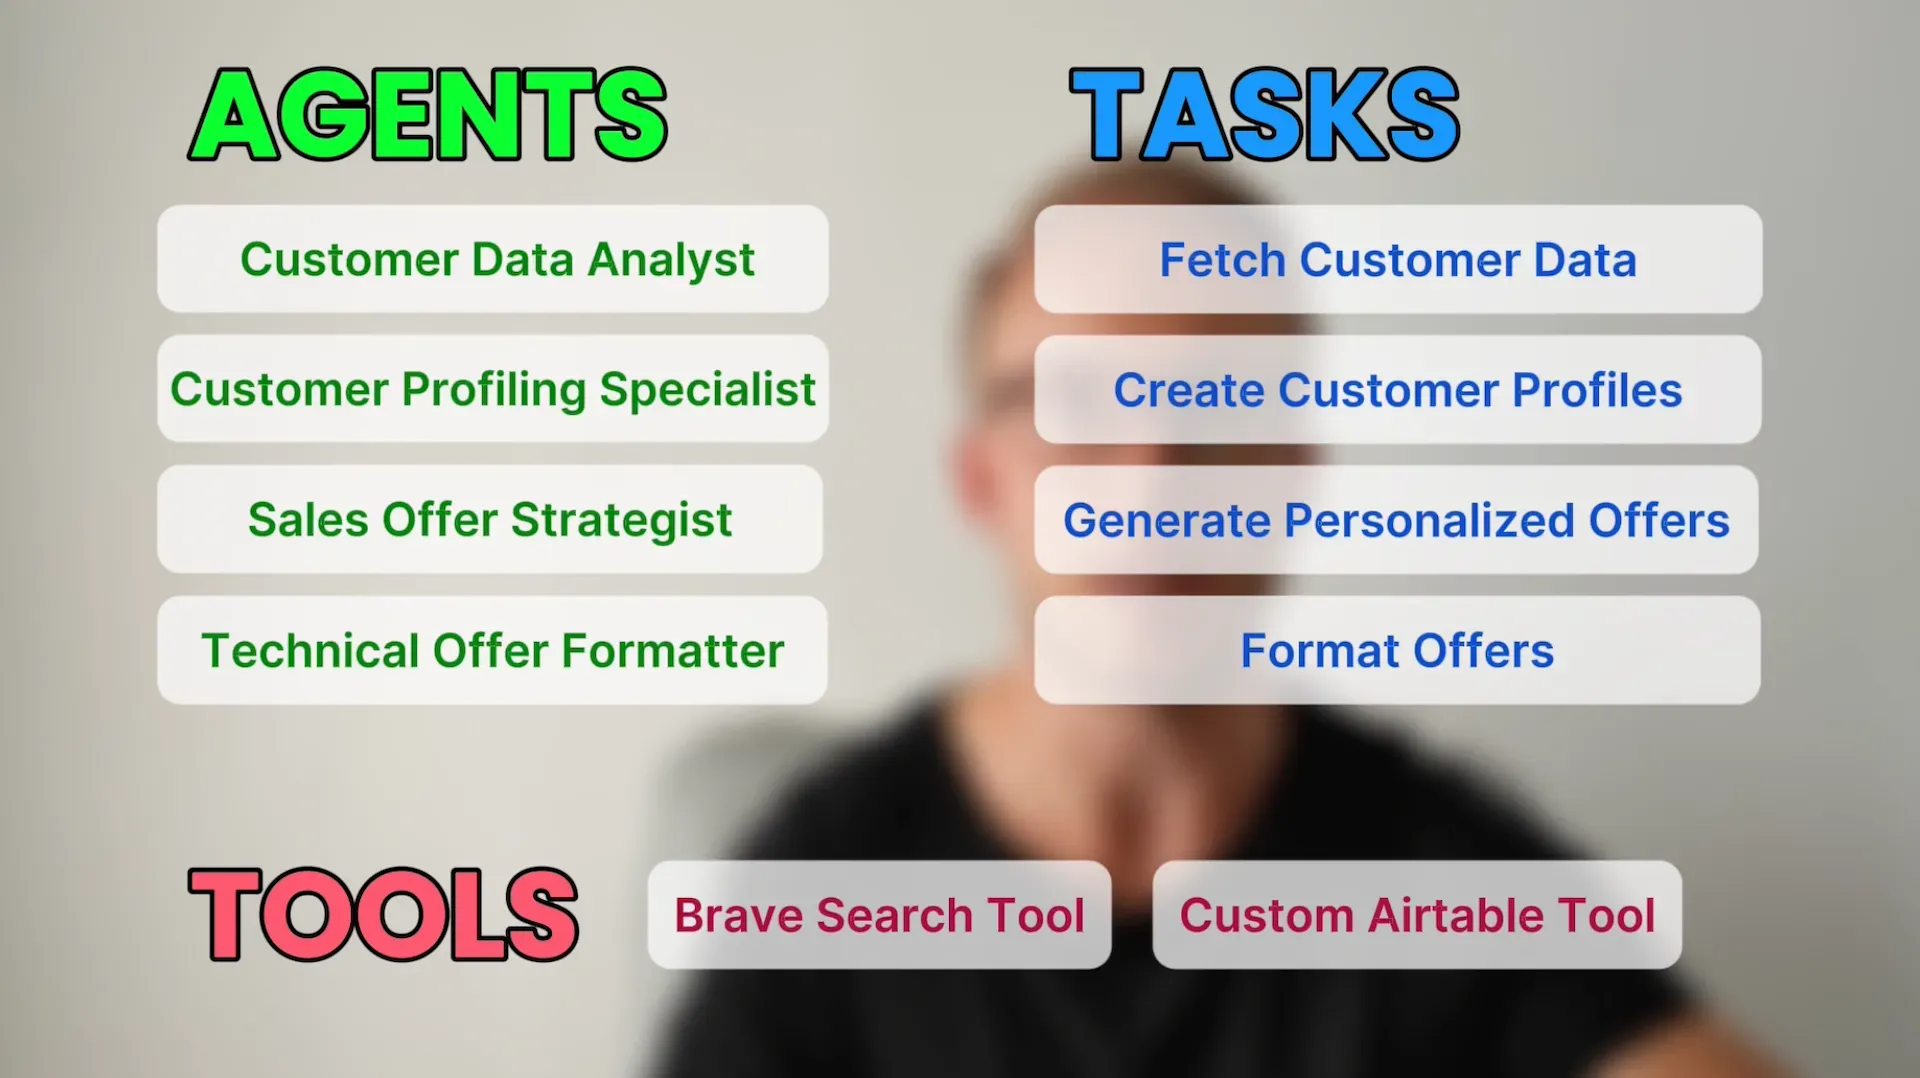
Four specialized AI agents:
Four different tasks:
Two essential tools:
This tutorial is perfect for developers, tech entrepreneurs, and business owners looking to leverage AI for personalized sales outreach. The finished system will be fully automated, allowing you to scale your sales efforts without increasing your workload.
Welcome to the future of sales - let's get started!
CrewAI is a powerful framework for building multi-agent AI systems. Unlike single-agent approaches, CrewAI lets you create specialized AI agents that work together, each with specific roles, goals, and backstories.
In our AI sales agent tutorial, we'll be using CrewAI to create a team of four specialized agents:
Each agent in the CrewAI framework has three key components:
These components help the agents understand their responsibilities and how they should interact with each other.
The agents work through a series of tasks:
To accomplish these tasks, our agents need access to tools. In this CrewAI tutorial, we'll implement:
While CrewAI handles the intelligence behind our system, we need a way to trigger the process and deliver the results. That's where n8n comes in.
n8n is a workflow automation platform that lets you connect different applications and services without writing code. In our case, we'll use n8n to:
When we deploy our CrewAI system (which we'll do later using CrewAI Enterprise), it creates API endpoints that n8n can interact with. These endpoints allow n8n to:
This integration creates a fully automated pipeline: n8n triggers CrewAI, CrewAI generates personalized offers, and then n8n delivers those offers to customers via email.
Before we build our AI sales system, we need to set up our CrewAI environment. The process is straightforward but requires attention to a few important details.
First, CrewAI has specific Python version requirements. You need Python version between 3.10 and above and below 3.13. This is crucial - if you're using Python 3.13 or higher (like I was initially), you'll need to downgrade.
To check your Python version, run this command in your terminal:
1python --version
Next, we need to install UV, a package manager for Python:
For MacOS users:
1curl -LsSf https://astral.sh/uv/install.sh | sh
For Windows users:
1powershell -ExecutionPolicy ByPass -c "irm https://astral.sh/uv/install.ps1 | iex"
Once UV is installed, we can install the CrewAI CLI:
1uv tool install crewai
With the CLI installed, we can create a new CrewAI project:
1crewai create crew sales-offer-crew
This command creates a new folder with the basic structure for our CrewAI project. The CLI will ask a few questions to configure your project:
After the project is created, you'll have a folder structure that includes:
source directoryconfig folder with agent and task definitionstools folder for custom toolscrew.py file for constructing your crewmain.py file with the run function that starts your systemThis structure gives us a solid foundation to build our AI sales system.
Now that we have our basic project structure, we need to define our agents, tasks, and tools. For this tutorial, I'll be using Claude 3.7 Sonnet with agent mode prompted to help us create the code. This AI assistant will help us generate the boilerplate code we need.
Let's start by defining our data model. We'll create a Pydantic model to structure the sales offers our system will generate:
1# models/sales_offer.py2from pydantic import BaseModel, Field3from typing import List, Dict, Any4from datetime import datetime567class SalesOffer(BaseModel):8 """Individual sales offer for a customer"""910 customer_id: str = Field(..., description="Customer ID from Airtable")11 customer_name: str = Field(..., description="Customer name")12 customer_email: str = Field(..., description="Customer email address")13 offer_title: str = Field(..., description="Title of the personalized offer")14 offer_description: str = Field(..., description="Detailed description of the offer")15 discount_percentage: float = Field(..., description="Discount percentage (0-100)")16 recommended_products: List[str] = Field(17 ..., description="List of recommended product names"18 )19 valid_until: datetime = Field(..., description="Offer expiration date")20 personal_message: str = Field(21 ..., description="Personalized message for the customer"22 )23 offer_code: str = Field(..., description="Unique code for this offer")24 reason: str = Field(..., description="Reasoning behind this offer selection")252627class SalesOfferCollection(BaseModel):28 """Collection of sales offers for multiple customers"""2930 offers: List[SalesOffer] = Field(31 ..., description="List of personalized sales offers"32 )33 generated_at: datetime = Field(34 default_factory=datetime.now, description="When these offers were generated"35 )36 total_customers: int = Field(..., description="Total number of customers processed")37 metadata: Dict[str, Any] = Field(38 default_factory=dict,39 description="Additional metadata about this batch of offers",40 )
This model captures all the information we need for a personalized sales offer: customer details, offer specifics, recommended products, and personalization elements.
Next, let's define our four agents in the agents.yaml file:
1data_analyst:2 role: >3 Customer Data Analyst4 goal: >5 Extract and organize customer data to identify valuable insights and patterns6 backstory: >7 You're a meticulous data analyst with a keen eye for patterns in customer behavior.8 You can spot trends in purchasing habits and customer preferences that others might miss.9 Your insights drive business decisions and help create personalized customer experiences.1011customer_profiler:12 role: >13 Customer Profiling Specialist14 goal: >15 Create detailed customer profiles based on their data and identify personalization opportunities16 backstory: >17 You're an expert in customer segmentation and personalization. Your specialty is18 transforming raw customer data into actionable profiles that highlight individual19 preferences, needs, and buying patterns. Your profiles are known for capturing the20 essence of what makes each customer unique.2122offer_creator:23 role: >24 Sales Offer Strategist25 goal: >26 Design highly personalized offers that maximize conversion rates and customer satisfaction27 backstory: >28 You're a creative strategist with years of experience in sales and marketing. You understand29 what motivates customers to make purchases and how to craft irresistible offers tailored30 to individual preferences. Your offers consistently achieve high conversion rates and customer satisfaction.3132offer_formatter:33 role: >34 Technical Offer Formatter35 goal: >36 Format sales offers into structured data objects ready for API integration37 backstory: >38 You excel at transforming business content into structured technical formats. With a background39 in both business and technology, you bridge the gap between marketing content and technical requirements.40 You ensure that all sales offers are properly formatted as valid JSON data with all required fields41 properly filled out and validated.
Each agent has a clear role, goal, and backstory.
Now, let's define the tasks for our agents in the tasks.yaml file:
1fetch_customer_data:2 description: >3 Use the Airtable tool to fetch all customer data from the database.4 Organize the data in a clear format and provide a summary of the customer base.5 expected_output: >6 A structured dataset of all customers with their attributes, along with a brief7 summary of key statistics about the customer base (number of customers, average8 spend, demographics breakdown, etc.).9 agent: data_analyst1011create_customer_profiles:12 description: >13 Analyze the customer data provided and create detailed customer profiles.14 For each customer, identify their preferences, buying patterns, and opportunities15 for personalization. Group similar customers into segments if appropriate.16 expected_output: >17 Detailed profiles for each customer that highlight their unique characteristics,18 preferences, and potential opportunities for personalized offers.19 agent: customer_profiler2021generate_personalized_offers:22 description: >23 For each customer profile, create a highly personalized sales offer that24 addresses their specific needs, preferences, and purchase history. Each offer25 should include a compelling title, description, discount percentage, recommended26 products, expiration date, and a personal message.27 expected_output: >28 A collection of personalized sales offers, with one detailed offer per customer.29 Each offer should be tailored to the customer's profile and include all required elements.30 agent: offer_creator3132format_offers_for_api:33 description: >34 Take the collection of personalized sales offers and format them according to the35 SalesOfferCollection Pydantic model specification. Ensure all required fields are36 present and properly formatted. Generate appropriate offer codes for each customer.37 The output must be valid JSON that conforms to the SalesOfferCollection schema.38 expected_output: >39 A valid JSON object conforming to the SalesOfferCollection schema, containing all40 personalized offers properly formatted for API integration.41 agent: offer_formatter
Each task has a clear description, an assigned agent, and an expected output.
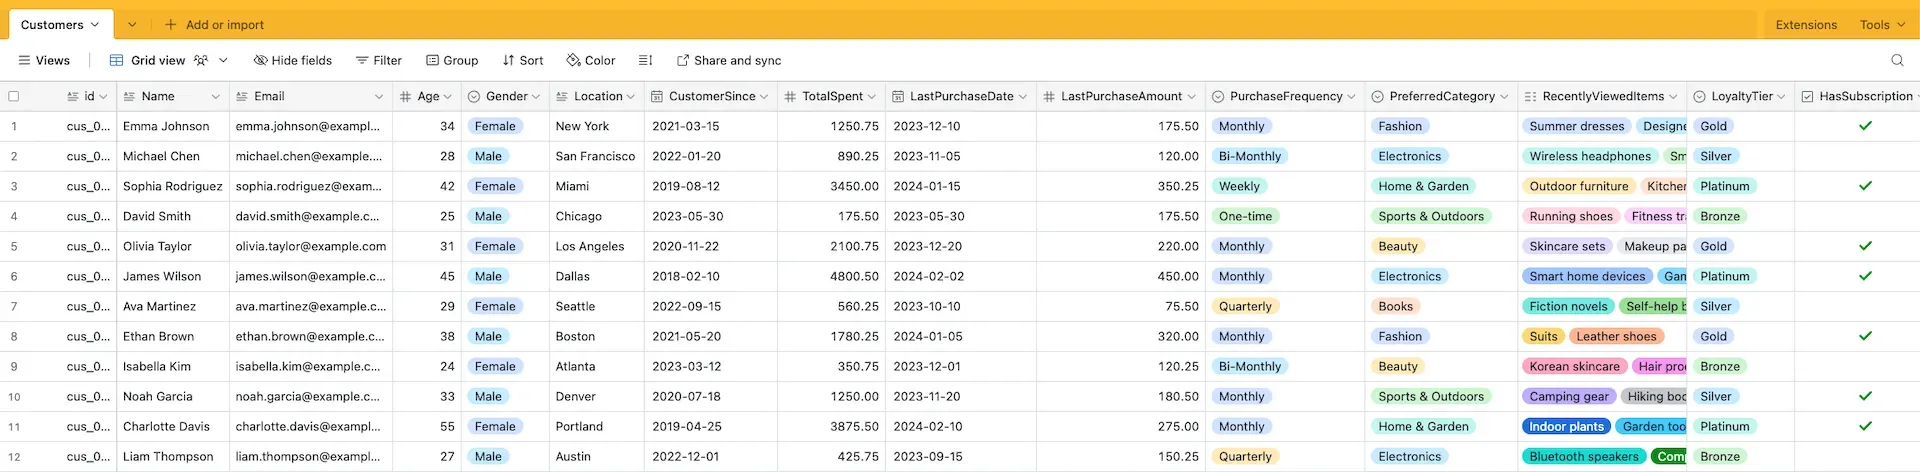
For our AI sales system to work, it needs access to customer data. We'll use Airtable as our database because it's easy to set up and integrate.
First, create an Airtable base with a table named "Customers" that includes these fields:
Add some sample customer data to test the system. Include a variety of demographics, interests, and behaviors to see how the system creates different personalized offers.
Next, we need to create a custom Airtable tool for our CrewAI agents. Here's the code for our airtable_tool.py:
1# tools/airtable_tool.py2import os3import requests4from typing import Dict, List5from crewai import Tool6from dotenv import load_dotenv78load_dotenv()910class AirtableTool(Tool):11 name = "Airtable Customer Data Tool"12 description = "Fetches customer data from Airtable"1314 def __init__(self):15 self.base_id = os.getenv("AIRTABLE_BASE_ID")16 self.table_name = os.getenv("AIRTABLE_TABLE_NAME")17 self.api_key = os.getenv("AIRTABLE_API_KEY")1819 if not all([self.base_id, self.table_name, self.api_key]):20 raise ValueError("Missing required Airtable environment variables")2122 def _execute(self) -> List[Dict]:23 """Fetch all customer records from Airtable"""24 url = f"<https://api.airtable.com/v0/{self.base_id}/{self.table_name}>"25 headers = {26 "Authorization": f"Bearer {self.api_key}",27 "Content-Type": "application/json"28 }2930 response = requests.get(url, headers=headers)3132 if response.status_code != 200:33 return f"Error fetching data: {response.status_code} - {response.text}"3435 records = response.json().get("records", [])36 customers = []3738 for record in records:39 fields = record.get("fields", {})40 customers.append(fields)4142 return customers
This tool connects to our Airtable database using the API key, base ID, and table name we'll specify in our environment variables.
We need to create a .env file to store these variables:
1OPENAI_API_KEY=your_openai_api_key2AIRTABLE_BASE_ID=your_airtable_base_id3AIRTABLE_TABLE_NAME=Customers4AIRTABLE_API_KEY=your_airtable_api_key5BRAVE_API_KEY=your_brave_search_api_key
You'll need to get these API keys from:
For the Airtable Base ID, look at the URL of your Airtable base. It's the part that starts with "app" after "airtable.com/" - copy that and paste it in your .env file.
Lastly, let's update our crew.py and main.py files:
1# crew.py2from crewai import Agent, Crew, Process, Task3from crewai.project import CrewBase, agent, crew, task4from crewai_tools import BraveSearchTool5from sales_offer_crew.tools.airtable_tool import AirtableTool6from sales_offer_crew.models.sales_offer import SalesOfferCollection789@CrewBase10class SalesOfferCrew:1112 agents_config = "config/agents.yaml"13 tasks_config = "config/tasks.yaml"1415 @agent16 def data_analyst(self) -> Agent:17 return Agent(18 config=self.agents_config["data_analyst"],19 tools=[AirtableTool()],20 verbose=True,21 )2223 @agent24 def customer_profiler(self) -> Agent:25 return Agent(26 config=self.agents_config["customer_profiler"],27 verbose=True,28 )2930 @agent31 def offer_creator(self) -> Agent:32 return Agent(33 config=self.agents_config["offer_creator"],34 tools=[BraveSearchTool()],35 verbose=True,36 )3738 @agent39 def offer_formatter(self) -> Agent:40 return Agent(config=self.agents_config["offer_formatter"], verbose=True)4142 @task43 def fetch_customer_data(self) -> Task:44 return Task(45 config=self.tasks_config["fetch_customer_data"],46 )4748 @task49 def create_customer_profiles(self) -> Task:50 return Task(51 config=self.tasks_config["create_customer_profiles"],52 context=[self.fetch_customer_data()],53 )5455 @task56 def generate_personalized_offers(self) -> Task:57 return Task(58 config=self.tasks_config["generate_personalized_offers"],59 context=[self.create_customer_profiles()],60 )6162 @task63 def format_offers_for_api(self) -> Task:64 return Task(65 config=self.tasks_config["format_offers_for_api"],66 context=[self.generate_personalized_offers()],67 output_pydantic=SalesOfferCollection,68 )6970 @crew71 def crew(self) -> Crew:7273 return Crew(74 agents=self.agents,75 tasks=self.tasks,76 process=Process.sequential,77 verbose=True,78 )
1# main.py2#!/usr/bin/env python3import sys4import warnings5from datetime import datetime67from sales_offer_crew.crew import SalesOfferCrew89warnings.filterwarnings("ignore", category=SyntaxWarning, module="pysbd")101112def run():13 inputs = {14 "current_year": str(datetime.now().year),15 "offer_expiration_days": 30,16 "default_discount": 15,17 }1819 try:20 result = SalesOfferCrew().crew().kickoff(inputs=inputs)2122 print(f"\nSales offers generated successfully!")2324 return result25 except Exception as e:26 raise Exception(f"An error occurred while running the crew: {e}")
Now let's deploy our CrewAI system so n8n can interact with it. We'll use CrewAI Enterprise for this, as it provides a simple way to deploy our system and create API endpoints.
First, make sure your code is in a GitHub repository. CrewAI Enterprise can connect directly to GitHub to deploy your code.
main); Enable automatic deployment for new commitsCrewAI Enterprise will automatically deploy your code and create API endpoints for you. It typically takes about 10 minutes for the deployment to complete.
Once the deployment is complete, you'll have three endpoints:
/inputs - Get information about the inputs your crew expects/kickoff - Start the CrewAI process/status/{kickoff_id} - Check the status of a running processYou can test these endpoints directly in the CrewAI Enterprise interface before connecting them to n8n.
To test the /kickoff endpoint, send a POST request with an empty JSON object {}. This will return a kickoff ID.
To test the /status endpoint, send a GET request with the kickoff ID in the URL. This will return the status of the process and the result if it's complete.
Once you've verified that everything is working, you can update your n8n workflow with the actual endpoint URLs provided by CrewAI Enterprise.
Now that we have our CrewAI system set up, we need to create an n8n workflow to automate the process and deliver our personalized offers to customers via email. In this section, I'll walk you through building a complete n8n workflow step by step.
With our backend ready, let's build the n8n workflow. You can access n8n by either:
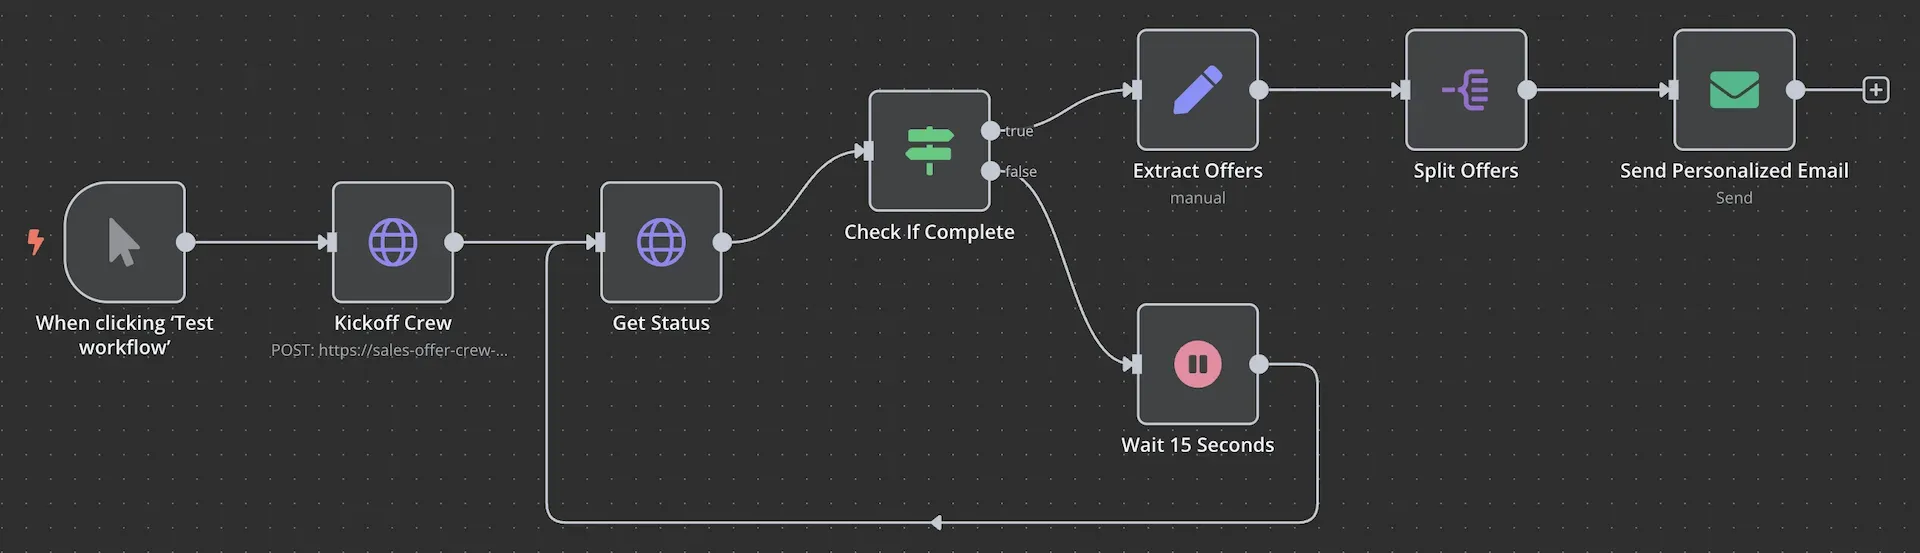
Start with an HTTP Request node to trigger our CrewAI system:
{"inputs": {}}; Content Type: application/jsonIf successful, you'll get a response like:
1{2 "kickoff_id": "abc123def456"3}
This kickoff ID is what we'll use to check the status of our CrewAI process.
Next, we need to check if our CrewAI process has completed. Since this can take 30-60 seconds, we'll create a loop:
https://sales-offer-crew-123.crewai.com/status/{{ $('Kickoff Crew').item.json.kickoff_id }}); Authentication: Bearer Token (same as before)Now we need to create a conditional loop that checks if the process is complete:
{{$json.state}}; Operation: is equal to; Value 2: SUCCESSThis node has two paths:
Let's handle the "false" path first:
This creates a polling loop that checks the status every 15 seconds until it succeeds.
Once the status is "SUCCESS", we need to extract and process the offers:
{{ $('Get Status').item.json.result.parseJson().offers }}Now we need to split the offers array so we can send an email for each offer:
This will output each offer individually, allowing us to send personalized emails to each customer.
Finally, we'll send personalized emails to each customer:
{{ $json.customer_email}}; Subject: {{ $json.offer_title }}; Content Type: HTML; HTML: Generate a template (see example template below)Here's an HTML email template you can use:
1<!DOCTYPE html>2<html>3<head>4 <style>5 body {6 font-family: Arial, sans-serif;7 line-height: 1.6;8 color: #333;9 }10 .container {11 width: 80%;12 margin: 0 auto;13 padding: 20px;14 }15 .header {16 background-color: #4CAF50;17 color: white;18 padding: 10px;19 text-align: center;20 }21 .content {22 padding: 20px;23 background-color: #f9f9f9;24 }25 .footer {26 text-align: center;27 padding: 10px;28 font-size: 0.8em;29 color: #666;30 }31 .promo-code {32 background-color: #f1f1f1;33 padding: 10px;34 text-align: center;35 font-weight: bold;36 letter-spacing: 2px;37 margin: 20px 0;38 }39 .button {40 display: inline-block;41 background-color: #4CAF50;42 color: white;43 padding: 10px 20px;44 text-decoration: none;45 border-radius: 5px;46 margin-top: 20px;47 }48 </style>49</head>50<body>51 <div class="container">52 <div class="header">53 <h1>Special Offer Just for You, {{ $json.customer_name }}!</h1>54 </div>55 <div class="content">56 <p>Hi {{ $json.customer_name }},</p>5758 <h2>{{ $json.offer_title }}</h2>5960 <p>{{ $json.offer_description }}</p>6162 <p>We're offering you a special <strong>{{ $json.discount_percentage }}% discount</strong> on these recommended products:</p>6364 <ul>65{{ $json.recommended_products.map(item => `66 <li>${item}</li>67`).join('') }}68 </ul>6970 <div class="promo-code">71 Your Promo Code: {{ $json.promo_code }}72 </div>7374 <p>{{ $json.personalized_message }}</p>7576 <p><strong>Why we think you'll love this:</strong> {{ $json.reason_for_recommendation }}</p>7778 <p>This offer expires on: {{ $json.expiration_date format="MM,DD,YYYY" }}</p>7980 <a href="<https://example.com/shop>" class="button">Shop Now</a>81 </div>82 <div class="footer">83 <p>This email was sent to {{ $json.customer_email }}. If you no longer wish to receive these emails, you can unsubscribe <a href="#">here</a>.</p>84 </div>85 </div>86</body>87</html>
Now that our workflow is complete, it's time to test it:
The first time you run this workflow, it might take several minutes for the CrewAI process to complete. Be patient and watch the execution progress.
To make this system truly automated, you can add a trigger node at the beginning of your workflow:
Now your workflow will run automatically according to your schedule, generating and sending personalized offers without any manual intervention.
Let's check one of the emails the system sent in our test. For example, here's the email Isabella Kim received:
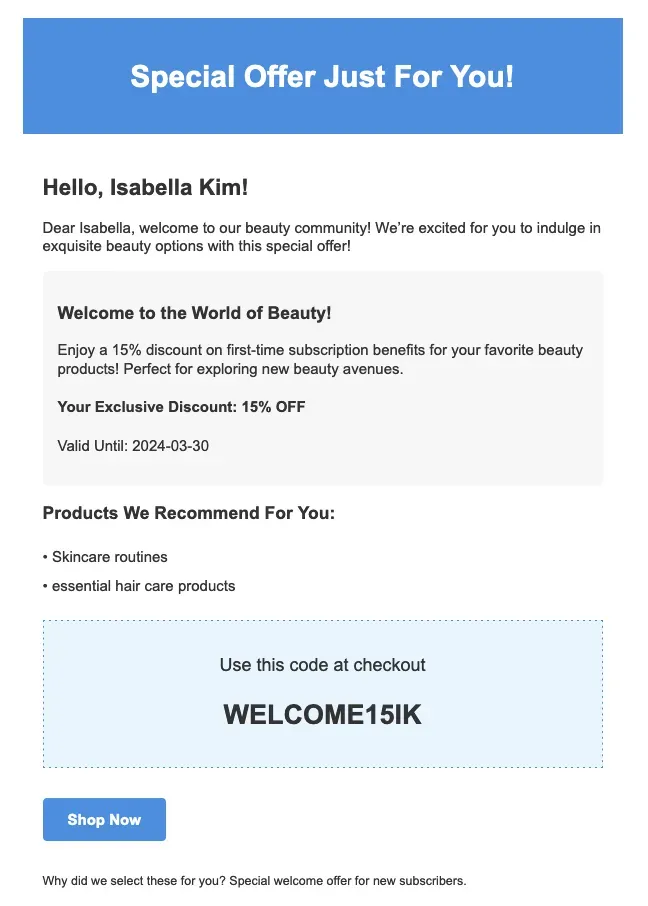
Notice how the system recommended beauty products specifically for Isabella, based on her preferences and browsing history from the Airtable data. The system recognized that her preferred category is beauty and that she recently viewed Korean skin care and hair products, so it tailored the recommendations accordingly.
This is the power of our AI sales system – each customer receives highly personalized offers based on their unique profile, all generated and delivered automatically.
Building an AI-powered sales automation system with CrewAI and n8n offers several key benefits:
If you want to build your own AI-powered sales automation system, here's a checklist to get started:
The AI sales system we've built in this tutorial represents the future of sales automation - intelligent, personalized, and always working. By combining the power of CrewAI's multi-agent framework with n8n's workflow automation, we've created a system that can:
As AI technology continues to evolve, we can expect these systems to become even more sophisticated, with deeper personalization and better targeting.
Resources:
GitHub repo with code example: sales-offer-crew
Keep reading
We write about coding agents, multi-agent systems, AI pair programming, and the engineering practices we use with clients. Hands-on lessons from real projects, not high-level theory.
Browse all articles